

Need to make square cuts? Miter saw station plans
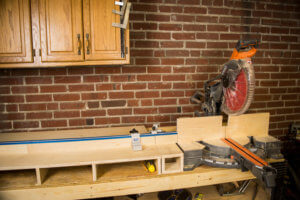
A simple and inexpensive miter saw station, in this case built with the Ridgid 12″ sliding Miter Saw.
There are so many plans out there for over the top 10 sheet of plywood masterpieces gleaming with a million drawers, so if you are looking for one of those…look elsewhere. This plan is for a great miter saw stand using nothing more than a flat surface and a little more than a half sheet of plywood, glue, screws, and maybe a couple of devoted hours. This plan also uses the Kreg Flip Stop system, which is awesome and an easy way to make quick accurate and repeatable cuts with so many different tools. You can get it here, http://shrsl.com/?fm1s
To get started, hopefully at this point you have figured out a flat surface to work with: a chunk of bowling alley on a few saw horses, grandma’s antique table, a chunk of counter top out of a dumpster, hell even the dumpster itself will work if you can acquire one legally…doesn’t really matter it just has to be at least 8 inches deep, preferably 20-24” in depth, but you can make do with whatever you can get.
Building a quick and easy miter saw station on top of any workbench.
In my case I started with a 2×4 basics 8 ft workbench but you could start with any flat surface or simple workbench. In my case I like the 2×4 basic bench because it goes together quickly without much measuring or chance for error. A 2×4 bench doesn’t take much longer, but the 2×4 basics kit makes some of the decisions for you.

Now the cut list…
You will need one sheet of plywood, you might even have useful leftovers if you plan your cuts efficiently. The first cut is to rip the sheet to the width of your table surface, or again at least 8 inches. I cut mine the full depth of my bench so down the road I can accommodate a couple drawers between the bench top and the top of the saw station, to get closer to that million drawer bench we all pine after (no pun intended.)
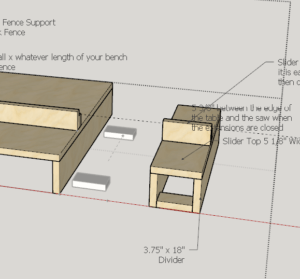
In my cut list, wherever it says 23.75 inches substitute the depth you want you bench top to be. Wherever it says 84”, really just the bench top, substitute the length of your bench top minus the width of the saw (and an extra 5 ⅜ inches in the case of the Ridgid saw with the 70 degree bevel)
1 23.75” x 84”
At least 1 23.75” x 3.75” piece per 18” of benchtop (The height of the saw table minus the thickness of your plywood [hint: ¾” plywood is almost definelty not ¾ of an inch. Make sure you make a test cut and test fit before you start putting everything together])
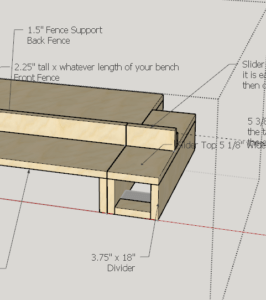
1 2.25 x 89 ⅜””
1 1.5” x 89 ⅜”
In the case of the Ridgid saw with the 70 degree bevel only:
1 5 ⅛” x 18”
2 3.75”x 18”
4 2” x 3.625” (The 3.625″ measurement in the 5 3/8″ table top minus the thickness of two pieces of whatever plywood you are using)
First, install the 3.75” x 23.75 in pieces square to the front edge of the bench, or parallel to each other if the “bench” does not have a straight front edge. Make sure the first and last one match up with the far right and far left edge of where your benchtop will go. I used a Kreg K5 Jig [ http://shrsl.com/?fm1z ] to pre drill pocket holes into these pieces and then glued and screwed them to the “bench” top. The pocket holes really help since they basically self square, but you could carefully square these up and glue and toe-nail them if that’s your thing.
Once all of the “dividers” are attached, it is time to affix the bench top (23.75″ x 84″ piece.) I clamped my bench top in place and attached it with glue and brad nails, but you could attach it with just glue and clamps. I find that the brad nails help with holding the bench top in place while the glue dries to let me move on to the next step quicker.
Next it is time to install your saw, it is important to have the saw in its final position before you attach the fence. Make sure the front edge of your saw lines up with the front edge of your bench or again at least in line with the front edge of your bench top. If you are using these plans for the Ridgid 12” sliding Miter saw with 70 degree bevel, leave 5 ⅜” between your saw and the bench top, or you can swing out the extension wing to ensure you accommodate this spacing for the bevel.
Now that the saw is in place, it is time to assemble the fence. Take the 2.25” x 89 ⅜” and the 1.5” x 89 ⅜” pieces (if you are going to use pocket holes to attach the fence like I did you will want to pre-drill the 1.5” rail prior to attaching these together) and glue and nail them together. Once the glue is dry, install the Kreg Flip Stop rails according to the instructions in the box on top of the 2.25” section with the provided screws. The 1.5” back rail will support the Kreg rail and reinforce the fence to keep it as straight as possible, attaching the fence rail with this separate piece will also reduce the deflection in the fence while you are attaching it to the bench top.

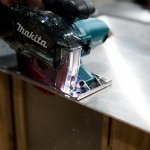
Glamour shots, messy shops are pretty too, form follows function and what not.
By now you should have you bench top and fence rail assembled, and you miter saw affixed to your bench, it is time to attach the fence to the benhtop.
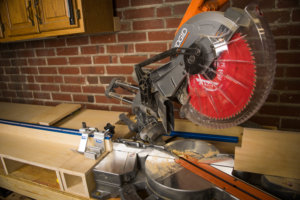
First take some scrap from the plywood offcuts and install a piece to the fences of your saw as a zero clearance plate. More often than not, you will want this attached to prevent tear out, so you might as well build the fence system around it. Next you will want to clamp your longest straight edge to the zero clearance fence on your miter saw on both sides of the blade. Then, clamp your assembled fence to the straight edge, line up the edges and affix the fence to your bench top, ensuring it is plum to the top of the bench top as you go and being sure not to deflect the straight edge.
If you don’t have the Ridgid saw with the need to accommodate the extra 25 degrees of miter, you’re done.
The sliding table is an engineering solution to maximize use of he fence and stops while preserving the cut capacity.
If you do…Take the extra pieces you have left over: 1 5 ⅛” x 18”, 2 3.75 x 18, & 2 of the 2”x 3.625” pieces and make a simple box, in this case I used brad nails and glue, but you could use pocket holes for this as well if you like. Install one (2”x3.625″) piece at the front of the box, and one at the back (as shown) these will function to line up the removable bench top and fence section consistently.
When the glue dries, slide the table under the fence, in the 5 ⅜” gap you left next to the saw, and affix the fence to the top of the sliding/removable table. Take the 2 extra pieces that 2” piece you have and carefully glue them to the bench top tightly against their partners you used to construct the bottom of the sliding/removable table. This is a great time to use hot glue or double sided tape. These will be used as stops once the table is detached from the rest of the benchtop.
Now comes the scary part, take a speed square, and a circular saw with a blade you are not afraid to lose some carbide teeth on and very carefully cut the Kreg fence and the Fence you installed, along the line where the sliding/removable table and the tabletop meet. This should free the sliding/removable table.
Just a detail shot for the measurements.
Carefully remove the sliding table, and add a few nails to your two stop blocks just for reinforcement.
Now, you are done. All that is left is calibrating the miter saw to perfect square and plum to the extended fence (follow your saw’s manual to do this, just make sure you use a longer square that can reference from the extended fence.)
I will soon be posting a video for calibrating the Kreg Flip-Stop system. You can also check out the accompanying video with these plans on YouTube
Support Wood.Work.LIFE by buying some of the products in this article from the affiliate links below:
Diablo 12” 80 tooth blade from ACME Tools
Kreg Flip Stop Track and Stop System
Kreg K5 System
Makita Compact Brushless Combo set
By Rick
Wood.Work.LIFE

The premier fine woodworking and lifestyle hub.


